
Personalizing communications
There are a number of types of data field. In both email and SMS, you can use these to insert date and time related fields, or additional data relevant to the recipient, such as their name.
For information about applying conditions to data fields, see Applying conditions.
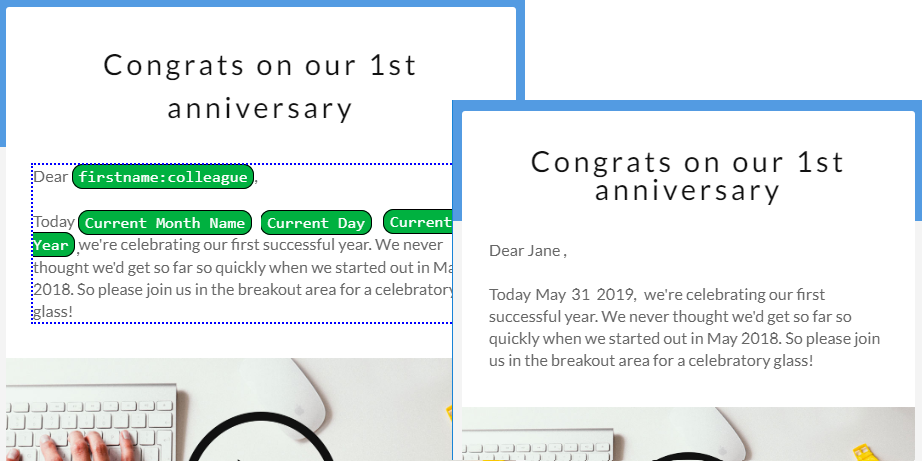
For example:
Add data fields to communications or templates
- Click Data Sources, then Add Data Source (this is optional).
- In the editor, click to mark the insertion point.
- Click Add personalization and select the data field from the list. This lists all the available fields in the data source and the System Fields. You can use the option Add custom personalization to specify a field that exists in one of your data sources but not in the currently selected data source. A dialog is displayed for you to insert the field name and default.
A red field is a reminder that the field is not in the current data source, or there is no data source selected:
Note: You can set a default to be used if a record in the data source does not have a value for the field. In the example above, colleague will be used when there is no firstname value. To set a default later, go to the editor and click the data field.
Using System Fields
When you click Add personalization, then System Fields, you will see a list of fields that are universally available (and independent of your data source). The list includes a number of date and time fields (such as Current Second, Current Month and Current Year), an Unsubscribe field (which allows you to set a default URL as an unsubscribe link), and two fields for viewing the communication in the user's browser. Fields are also included for adding a Title or a Greeting (for details, see below).
Title field
A Title is defined as the means of addressing a customer (for example, Mr, Mrs or Ms). This is used as a prefix to the customer's name.
Select Title from the list of System fields.
Click Title and you are then taken to the Logic tab so that you can specify one or more Logic conditions that control the value of Title.
Click Add rule to add a new logic rule.
Click Then Show to see a dropdown list of languages; selecting a language will in turn reveal a dropdown list of available Titles for that language. Select the appropriate title to be displayed if the logic rules are satisfied. You can also add a Custom Title.
Once logic conditions are applied, the field appears like this:

Greeting field
A Greeting is defined as the way someone is greeted (for example, Hello or Hi).
Select Greeting from the list of System fields. You are prompted to set a default for the Greeting.
Click Greeting and you are then taken to the Logic tab so that you can specify one or more Logic conditions that control the value of Greeting.
Click Add rule to add a new logic rule.
Click Then Show to see a dropdown list of languages; selecting a language will in turn reveal a dropdown list of available Greetings for that language. Select the appropriate greeting to display if the logic rules are satisfied. You can also add a Custom Greeting.
Once logic conditions are applied, the field appears like this:

Using curly brackets
As an alternative to selecting a data field from the Add personalization dropdown, you can include a variable in the text or subject line by enclosing the variable name in two sets of curly brackets. For example, {{surname}} would display the value of the variable called surname.
You can also set the default within the curly brackets, for example:
{{firstname or 'Dear colleague'}}
Including a uid
You can include the uid (unique identifier) of the current Data Source row. To do this, simply enter "uid" in double curly brackets like this: {{uid}}.
Testing the communication
Preview the communication and click through the records in the data source to check that the data (and any defaults that you have set) work with the communication. For both email and SMS, you can also send some test emails or messages.