Images
To include an image in a video communication, drag and drop the image symbol from the right to the place in the communication where you want the image to appear. The image icon appears in the communication as follows:
![]()
You can resize the image icon by dragging the corners. Click the three dots to see a menu that allows you to delete or copy the button, as well as to bring it into the foreground or send to the background.
Once you have inserted the image icon, click it. The block palette for editing appears at the right:
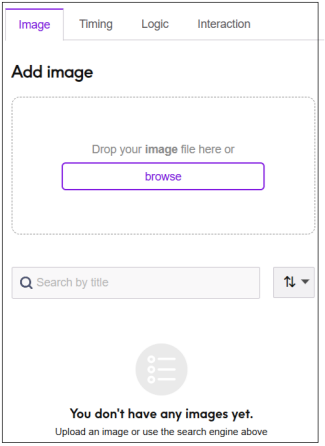
Image tab
If the image is not personalized, the Personalized image toggle switch should be off. Drag and drop your image file here, or click Browse Files to browse to the image file. If you have already uploaded one or more images, you can search for them by title. You can also use an image from the Asset Library.
To add a personalized image, which can be different for different users, click the toggle switch Personalized Image. The following is displayed:
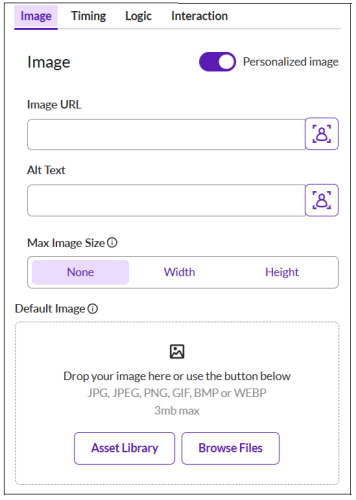
Enter the following to specify the personalized image:
- Image URL. Click the personalization icon (
 ) and then select the appropriate field. You must have first created a field which defines a URL for each recipient.
 - Alt text. Click the personalization icon (
 ) and then select a field that provides the alternative text that will be displayed if the image defined by Image URL, and the Default image, are both unavailable.
 - Max Image Size. Specify the maximum Width and Height to define a maximum image size, or None for no maximum size.
- Default image. Specify an image (from the Asset Library or a local file) to be used if the specified image URL is not found.
Timing tab
For information about how to use the Timing tab, see Timing tab.
Logic tab
For more information about how to use the Logic tab, see Using the Logic tab to apply conditions.
Interaction tab
This tab allows the user to interact with the image by clicking on it, to jump to another scene or URL. The tab looks like this:
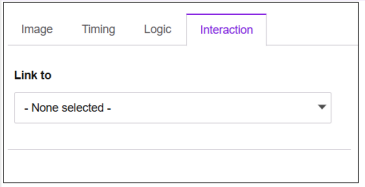
By default, Link to is set to None selected, which means that the image has no interaction with the user.
Linking to a URL
To link to a URL, select Link to url from the dropdown. The following screen is displayed:
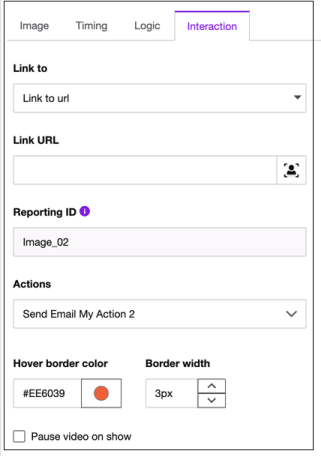
Link URL
This field specifies the URL.
Click the Add personalization button at the right ( ) to insert a variable at the cursor position in the Link URL field. For more information, see Personalizing communications. With variables inserted, the field looks like this:

An alternative way of including a variable is to enclose the variable name in double curly brackets. For example:
www.{{domain}}.com
{{domain}} will be replaced with the value of the variable called domain in your selected Data Source (selected using the Contacts tab).
You can include the uid of the current Data Source row in the URL. To do this, simply enter "uid" in double curly brackets like this: {{uid}}.
You can also link an image to a text box or dropdown value from elsewhere in your video. To do this, enter the ID in the Link URL field. For example, if the text box ID is overlay_123, enter the following in the Link URL field:
{{overlay_123}}
This will be replaced with the value entered from the text box with that ID.
Reporting ID
This is used to identify button clicks in the CSV file that you can download when looking at Video Reporting Statistics. Communicate will allocate a Reporting ID when you add a new image, but you can edit this ID.
The Reporting ID should be unique within each video. If multiple images have the same ID, only the last image clicked is shown in the report. There may be occasions when this is what you want. For example, if you have an ID called rating, you could allocate the same ID to five images labeled 1, 2, 3, 4 and 5. The report will then show (in the column for rating) which value was last clicked.
Actions
You can select an action to be added to the video. For how to create actions, see Configuration.
Hover border color
The color of the image border that is displayed when the user hovers over the image.
Border width
The width of the image border that is displayed when the user hovers over the image.
Pause video on show
Select this option to pause the video when the image is displayed. The video will only resume when the user interacts with the image by clicking it.
Linking to a scene
To link to scene, select Link to scene from the dropdown. If other scenes are available (that is, the video has a minimum of two scenes), the other scenes are listed in a dropdown. Select the scene that you want. The following screen is displayed:
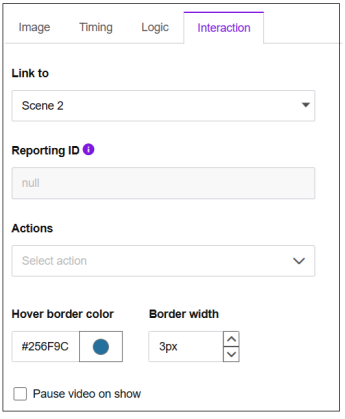
Select the scene name from the dropdown. The video goes to the specified scene when the user clicks the image.
For information on the other fields, see Linking to a URL.
