Send Attachment action
You can use a Send Attachment action to send a file to the user as part of the conversation.
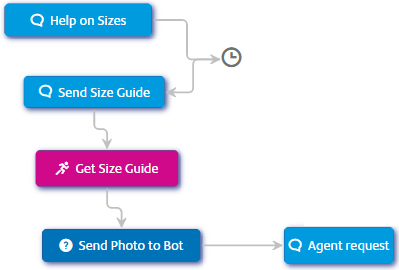
In the following example, an attachment is sent to the user. The user responds to the information in the attachment, then sends an attachment back to EngageOne™ Communicate Chat. They can then request help from a live agent. The agent will have access to the uploaded attachment:

Sending attachments with the Send Attachment action
The above example uses a Send Attachment action for sending the attachment to the user. The details of the attachment are entered on the Settings tab of the action:
| File name | The name of the attachment. You can use this to rename the attachment. If empty the attachment will be the filename given in the endpoint. |
| Endpoint | The URL of the attachment. |
| Authorization | The action makes a REST GET request. Enter the authorization token required by the server. |
| Content-Type | Media type of the attachment. |
| Headers | The header if required by the request, entered as key-value pairs. |
Receiving attachments
To enable a chatbot to receive attachments, use a message, or a Question interaction with the answer format Accept any answer.
Uploaded attachments exist in the session for the duration of the session, and are automatically deleted once the user's session expires.
Agents can download attachments
There are two ways of downloading attachments:
- Agents can download attachments from the Live Takeover page. To do this, select the conversation - you do not need to take over the conversation. The attachment is displayed in the chat window.
- Obtain the attachment from the email system. Outside of Live Takeover, attachments are emailed to the address configured for the chatbot.
